
So – a little preamble. This process, sucks. VMWare is being lazy with their method for installing 3rd party certificates. The walk throughs they provide via KB articles online are missing important steps, they are vague, and – well… you get it…
Disclaimer : This process works for me. It doesn’t mean that it will 100% work for you, but it should help.
About my setup : I am currently running VCenter 6 appliances with external PSC’s. The process should be similar if you are using embedded PSC’s, just provide the VCenter server name/IP instead of the PSC info in the steps below if you are using embedded. (I have not tested this).
Some prerequisites:
1. Have Putty Installed
2. Have WinSCP installed
3. Know how to enable bash on your VCEnters
4. Connect and enable BASH via putty BEFORE connecting with WinSCP to transfer files
(I have found that having bash enabled/running – enables your ability to connect via WinSCP to transfer files)
5. This process is for VMWARE APPLIANCES and has not been tested on Windows VCenter installs, but SHOULD work the same (Minus the putty/winscp parts)
Lets install some SSL Certs!
First steps : Generating Certificate Signing Request
0. Take a snapshot of your VCenter and PSC (as a failsafe)
1. Putty to your VCenter appliance
2. Login as root
3. Enable the bash shell if its not enabled by typing : shell.set –enabled true
4. Start the bash prompt by typing : shell
5. cd to /usr/lib/vmware-vmca/bin/
6. Make a directory to export the certs too : EXPORTS/step1
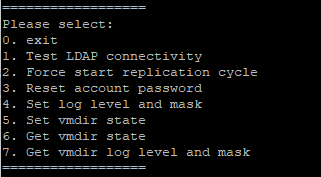
7. Run Certificate manager by typing : ./certificate-manager (Make putty full screen first)
8. Select option 1 to generate your certs.
– You will be prompted to provide a valid SSO and VC privileged account, just hit enter and it should default you to the [email protected] account.
– Provide the proper password when asked
– You may be prompted “Performing operation on distributed setup, Please provide valid Infrastructure Server IP.” Thats just the IP of the PSC.
9. You will be prompted to hit 1 or 2. 1 is the option to generate the certs, do this.
10. You will be asked to provide a directory location to write the CSR’s to. Give it your folder, for me it was : /usr/lib/vmware-vmca/bin/EXPORTS/step1/
11. You will be asked all your local info, most of the defaults will work. The defaults are shown at the end of the prompt like “Please provide a blah blah [PLOP]”, in this case – PLOP would be the default.
– VMCA and HOSTNAME are the FQDN of the system your creating the certs for.
12. Your certs should now be saved to the folder you specified in step 10. Install WinSCP on your computer. This will be used to get the certs. Open the WinSCP client, select SFTP from the protocol drop down, click Advanced, click SFTP, add “shell /usr/lib64/ssh/sftp-server” (without quotes) to the SFTP Server dropdown box up top. Click OK, click SAVE. You should now see a session saved on the left side with the host name you provided earlier. Double click it – you will be prompted for a username and password. Now you should see the root of your VCenter servers storage. Browse to the folder you specified in step 10. Copy the STEP1 folder to your local desktop.
13. Login to your Microsoft Active Directory Certificate Services website.
14. Click “Request a Certificate”
15. Click “Submit a certificate request by using a base-64-encoded CMC or PKCS #10 file, or submit a renewal request by using a base-64-encoded PKCS #7 file.”
16. Paste your vmca_issued_csr.csr contents in the top box. (Make sure there are no extra spaces or line breaks)
17. Select vSphere 6.0 template (the 6.0 template works on 6.5 and 6.7)
18. Click submit
19. Click the “Base 64” radio button
20. Click “Download Certificate” and save it as certnew.cer (I put this in a folder called step2 on my local desktop)
21. Click on “Download certificate chain” and save it as cachain.p7b (I put this in the SAME step2 folder)
22. Right click on the .P7B file, and click OPEN
23. Expand the Certificates folder, RIGHT click on the CA (bottom of list), and click ALL TASKS then Export.
24. Click NEXT and then “BASE 64 Encoded” (Second option), and click NEXT, save this as ROOT-64.cer in the step 2 folder
– Do the same for the INTERMEDIATE cert (This is the one directly above the root) and save it as INT1.cer in the step 2 folder
– Close certificate manager
25. Lets make a the chaining certs. (This is the stupid part)
– Create a new TEXT file and call it CHAIN.CER
– Open the INT1.cer, copy all the text, and PASTE it into the CHAIN.CER file and now close the INT1.cer
– Open the ROOT-64.cer, copy all the text, and PASTE it into the CHAIN.cer below the INT1.cer text you pasted in the prior step
– Make sure there are no extra spaces/line breaks/etc
– Create a new TEXT file and call it RUI.CRT, open it with notepad
– Open the CERTNEW.cer file, copy all the text, and PASTE it into the RUI.crt file and close the CERTNEW.cer file
– Open the CHAIN.cer file, copy all the text, and PASTE it into the RUI.crt file (Below prior text) and close both files (Saving the RUI.cer) (Make sure to remove all extra spaces)
26. Using the saved session from step 12, connect back to your appliance with WinSCP. Upload the ENTIRE step2 folder and its contents to the same folder that the step1 folder is in. (/usr/lib/vmware-vmca/bin/EXPORTS/)
27. Go back to your putty session and continue or re-run the certificate-manager app again and this time select option 2 to import.
-You will be asked for a “Valid custom cert for machine ssl” This will be the full path to the RUI.CRT file (/usr/lib/vmware-vmca/bin/EXPORT/step2/RUI.crt)
-Next do the same for the “machine SSL key”, (Key generated in the STEP1 folder) : /usr/lib/vmware-vmca/bin/EXPORT/step1/vmca_issued_key.key
-Next the same for the “Signing Certificate” (This will be the CHAIN.cer file) : /usr/lib/vmware-vmca/bin/EXPORT/step2/chain.cer
-“Your going to replace the machine SSL cert using custom cert continue operation” prompt will pop up – hit Y and then enter. If the process fails, it rolls back – calm down, just hit Y and do it! lol
Notes:
1. When Importing;
-“Valid custom Certificate” = RUI.crt
-“Valid custom key for machine SSL” = vmca_issues_key.key
-“Signing certificate of the Machine SSL certificate” = chain.cer
2. I have found that sometimes you have to restart the services after the process is complete. I usually wait about 5 min after the process is complete and then issue the following commands:
To stop the services : service-control –stop –all
To start the services : service-control –start –all
Putty command to Find your PSC:
/usr/lib/vmware-vmafd/bin/vmafd-cli get-ls-location –server-name localhost (Putty command)
(Updated 3.13.19)
-Fixed some naming mix ups that made it confusing
-Clarified 6.5/6.7 support
(Update as of 4.22.21)
-Confirmed working on 7.0.2 vCenter
Note for 6.7 users: To allow WinSCP access you may need to type : chsh -s /bin/bash root via terminal prior to connecting.


Added some cleaner text to this process… The same process works on windows vcenters as well. The things to know for a Windows VCenter:
1. Path to cert manager : C:\Program Files\VMware\vCenter Server\vmcad\
2. The certificate manager is a bat file.
3. When I reference putty – for windows, just RDP to the box and use CMD
4. For WinSCP, just browse to the box and copy and paste, or copy and paste through RDP session
The rest is for the most part, the same. GL!!